Chapter 22: Snake Game Mechanics
Learn how to implement classic snake-like game mechanics and organize game objects into reusable components.
In the previous chapters, we've built all the fundamental systems needed for our game: graphics, input, collision detection, audio, scene management, and a user interface. Now it's time to transform our demo into a complete experience by implementing classic snake-like game mechanics. Before we do that, we first need to define what mechanics make a snake game.
In this chapter, you will:
- Understand the core mechanics that define a classic snake-like game.
- Learn how to implement grid-based movement with timed intervals.
- Create a segmented character that grows when collecting objects.
- Implement a unified input controller for game actions.
- Build the
SlimeSegmentstruct for storing segment data. - Create the
Slimeclass to manage all snake-like behavior for the slime. - Create the
Batclass as the collectable object.
Note
This chapter will not focus much on MonoGame itself, but rather our implementation of the mechanics to transform our current game into a snake-like game.
Understanding Snake Game Mechanics
In a classic snake-like game, the mechanics follow a set of simple but engaging rules:
- The player controls a snake by telling it to move in one of four cardinal directions (up, down, left, and right).
- The snake cannot reverse into itself, only moving forward or perpendicular to its current direction.
- The actual movement of the snake occurs at regular timed intervals, creating a grid-based movement pattern.
- When the snake eats food, it grows longer by adding a new segment to its tail.
- If the snake collides with a wall or its own body, the game ends.
The mechanics create an increasingly challenging experience as the snake grows longer, requiring planning and reflexes to avoid collision.
Directions
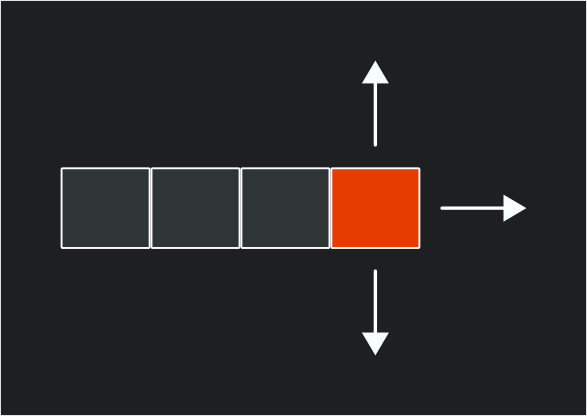
In snake, players input a cardinal direction (up, down, left, and right), to indicate which direction the snake will move during the next movement cycle. When direction input occurs, it must be checked against the current direction to determine if the move is valid.
For example, if the snake is moving to the right, an invalid input would allow a player to move it to the left. Doing so would cause the head of the snake to reverse direction and immediately collide with the first body segment. This means the only valid inputs are those where the next direction would be the same as the current direction or perpendicular to the current direction.
 |
|---|
| Figure 22-1: An example snake with four segments, the head segment highlighted in orange, moving to the right. Arrows show that the only valid movements for the head segment are up or down (perpendicular) or to continue to the right. |
Movement Cycle
Instead of moving every update frame as a directional input is being pressed, the snake instead only moves during regular timed intervals. A timer is used to determine how much time has passed since the last movement cycle, and when it reaches a set threshold, the next movement cycle occurs. During this movement cycle, the snake should move forward in the direction that was input by the player between the last and current movement cycles. This creates the grid-based movement system typically found in snake-like games.
There are various methods for handling the movement, such as iterating through each segment of the snake and updating the position of that segment to move forward. Methods such as this though are wasteful, since visually the only parts of the snake that move on the screen are the head and the tail.
Instead, a more common approach is to:
Make a copy of the head segment.
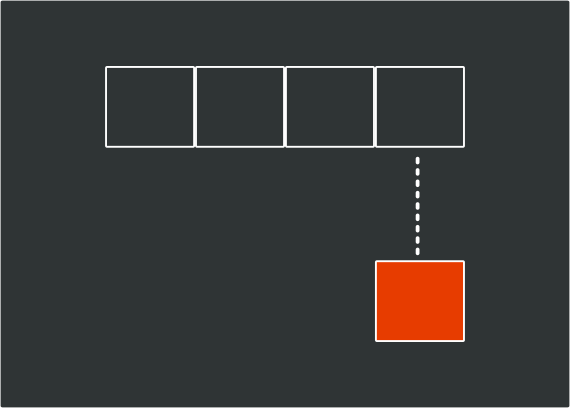
Figure 22-2 From a snake with four segments, a copy of the head segment is made, represented by the orange block Update the properties of the copy so that it is positioned where the original head segment would have moved to.
Insert the copy at the front of the segment collection.
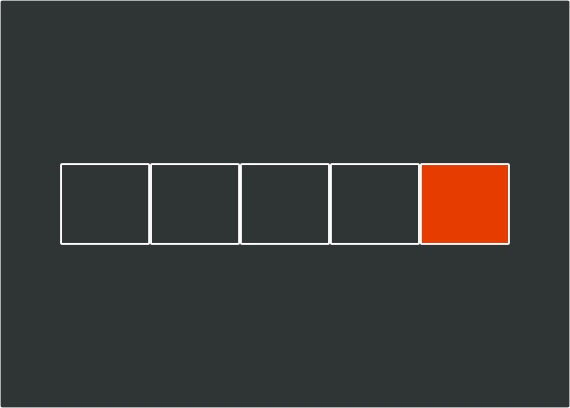
Figure 22-3: The copy of the head segment, represented by the orange block, is inserted at the front of the segment collection as the new head, which now makes it five segments (one too many) Remove the tail segment.
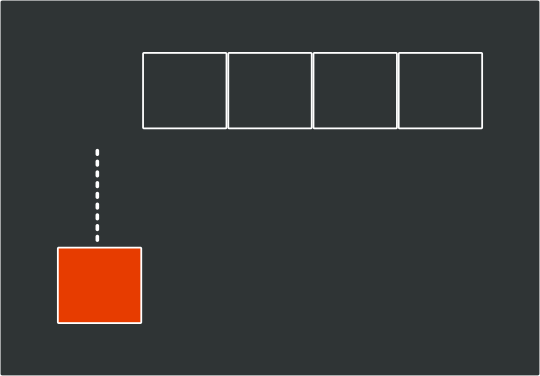
Figure 22-4: The tail segment of the snake is removed, bringing it back to the original four segments, giving the illusion that the entire snake moved forward
By doing this, no matter how many segments the snake body has, we only ever need to update two of them, the head and the tail.
Growth
The next core mechanic for a snake-like game is the growth of the snake. Typically, somewhere in the game is an objective for the snake to eat, such as an apple. When the head of the snake reaches this objective, a new segment is added to the snake's body, making it longer, the player's score is increased, and a new objective is spawned at a random location within the game.
This mechanic also acts as an artificial difficulty curve for the game. As the body of the snake grows longer, it requires planning to avoid creating situations where the snake becomes trapped by its own body making it impossible to avoid a collision.
Game Over
The challenge in a snake-like game is to avoid colliding with either a wall or another segment of the snake body. Doing so will cause a game over condition as the snake can no longer continue moving forward.
Implementing Snake-Like Mechanics In Our Game
Now that we have a foundational set of rules in place for the mechanics of a snake-like game, let's implement them into the current demo we've been building up. Our game will adapt these mechanics to fit them into our existing game structure:
- Instead of a snake, we will use the slime and create a chain of slime segments that follow the slime at the front.
- The player will control the direction of the slime segment
- The bat will serve as the objective to acquire to grow the slime segment.
- Collisions with either the walls of the room or a slime segment will result in a game over state.
As we implement these mechanics, we're also going to be creating classes that encapsulate the properties and functions of existing implementations in the game scene, such as the slime and the bat. For example, currently, the game scene tracks fields for the AnimatedSprite and the position of the slime, as well as updating, input handling, and drawing the slime. These can be moved into their dedicated classes encapsulating the functionality and also cleaning up the code in the game scene that has grown quite large.
The GameController Class
Currently, we have two methods dedicated to handling input in the game scene, CheckKeyboardInput and CheckGamePadInput. Both of these methods essentially perform the same logic across different input devices. This presents an opportunity to improve our code.
To simplify input handling for the game, we can create a dedicated class that consolidates the input methods, providing a unified input profile for the game. This pattern is widely used in game development to separate the "what" (game actions) from the "how" (specific input devices and buttons).
In the DungeonSlime project (your main game project), create a new file named GameController.cs in the root directory and add the following code:
using Microsoft.Xna.Framework;
using Microsoft.Xna.Framework.Input;
using MonoGameLibrary;
using MonoGameLibrary.Input;

namespace DungeonSlime;

/// <summary>
/// Provides a game-specific input abstraction that maps physical inputs
/// to game actions, bridging our input system with game-specific functionality.
/// </summary>
public static class GameController
{
    private static KeyboardInfo s_keyboard => Core.Input.Keyboard;
    private static GamePadInfo s_gamePad => Core.Input.GamePads[(int)PlayerIndex.One];

    /// <summary>
    /// Returns true if the player has triggered the "move up" action.
    /// </summary>
    public static bool MoveUp()
    {
        return s_keyboard.WasKeyJustPressed(Keys.Up) ||
               s_keyboard.WasKeyJustPressed(Keys.W) ||
               s_gamePad.WasButtonJustPressed(Buttons.DPadUp) ||
               s_gamePad.WasButtonJustPressed(Buttons.LeftThumbstickUp);
    }

    /// <summary>
    /// Returns true if the player has triggered the "move down" action.
    /// </summary>
    public static bool MoveDown()
    {
        return s_keyboard.WasKeyJustPressed(Keys.Down) ||
               s_keyboard.WasKeyJustPressed(Keys.S) ||
               s_gamePad.WasButtonJustPressed(Buttons.DPadDown) ||
               s_gamePad.WasButtonJustPressed(Buttons.LeftThumbstickDown);
    }

    /// <summary>
    /// Returns true if the player has triggered the "move left" action.
    /// </summary>
    public static bool MoveLeft()
    {
        return s_keyboard.WasKeyJustPressed(Keys.Left) ||
               s_keyboard.WasKeyJustPressed(Keys.A) ||
               s_gamePad.WasButtonJustPressed(Buttons.DPadLeft) ||
               s_gamePad.WasButtonJustPressed(Buttons.LeftThumbstickLeft);
    }

    /// <summary>
    /// Returns true if the player has triggered the "move right" action.
    /// </summary>
    public static bool MoveRight()
    {
        return s_keyboard.WasKeyJustPressed(Keys.Right) ||
               s_keyboard.WasKeyJustPressed(Keys.D) ||
               s_gamePad.WasButtonJustPressed(Buttons.DPadRight) ||
               s_gamePad.WasButtonJustPressed(Buttons.LeftThumbstickRight);
    }

    /// <summary>
    /// Returns true if the player has triggered the "pause" action.
    /// </summary>
    public static bool Pause()
    {
        return s_keyboard.WasKeyJustPressed(Keys.Escape) ||
               s_gamePad.WasButtonJustPressed(Buttons.Start);
    }

    /// <summary>
    /// Returns true if the player has triggered the "action" button,
    /// typically used for menu confirmation.
    /// </summary>
    public static bool Action()
    {
        return s_keyboard.WasKeyJustPressed(Keys.Enter) ||
               s_gamePad.WasButtonJustPressed(Buttons.A);
    }
}
The GameController class implements an important design pattern in game development known as the "Input Abstraction" or "Command" pattern. This pattern separates what happens in the game (the actions) from how players trigger those actions (the inputs).
This separation provides several benefits, including:
- Input Device Independence: The game logic doesn't need to know which input device the player is using. Whether they're playing with a keyboard, gamepad, or touch screen, the game only cares that a "move up" action was triggered, not which specific button or key caused it.
- Simplified Input Handling: Instead of checking multiple input combinations throughout the codebase, game objects can simply ask "Should I move up?" through a clean API call.
- Easy Rebinding: If you want to add key rebinding features, you only need to modify the
GameControllerclass, not every piece of code that uses input. - Consistent Input Logic: The rules for determining if an action occurred (like checking if a button was just pressed version being held down) are defined in one place.
- Cross-Platform Compatibility: When porting to different platforms with different input methods, you only need to update the
GameControllerclass to map the new input devices to your existing game actions.
By implementing this pattern in our game, we are not only making our current input handling cleaner, but we are also establishing a foundation that would make it easier to add features like input customization or support for new input devices in the future.
With our input handling system in place, now we can turn our attention to implementing the core mechanics of our snake-like game. First, we need to create a structure that will represent each segment of the slime's body.
The SlimeSegment Struct
Next, we will need to implement a structure that can represent each segment of the slime. This structure will store the position and movement data for each segment.
In the DungeonSlime project (your main game project), create a new directory named GameObjects. We will be putting all of our code related to the objects within the game here. Next, create a new file named SlimeSegment.cs inside the GameObjects directory you just created and add the following code:
using Microsoft.Xna.Framework;

namespace DungeonSlime.GameObjects

public struct SlimeSegment
{
    /// <summary>
    /// The position this slime segment is at before the movement cycle occurs.
    /// </summary>
    public Vector2 At;

    /// <summary>
    /// The position this slime segment should move to during the next movement cycle.
    /// </summary>
    public Vector2 To;

    /// <summary>
    /// The direction this slime segment is moving.
    /// </summary>
    public Vector2 Direction;

    /// <summary>
    /// The opposite direction this slime segment is moving.
    /// </summary>
    public Vector2 ReverseDirection => new Vector2(-Direction.X, -Direction.Y);
}
This structure contains fields to track:
At: The current position of the segment.To: The position the segment will move to during the next movement cycle if it is the head segment.Direction: A normalized vector representing the direction the segment is moving in.ReverseDirection: A computed property that returns the opposite of theDirectionproperty.
Note
We are implementing this as a struct rather than a class because SlimeSegment is a small, simple data container with value semantics. Structs are more efficient for small data structures since they're allocated on the stack rather than the heap, reducing garbage collection overhead. Since our game will potentially create many segments as the snake grows, using a struct can provide better performance, especially when we will be copying segment data during movement operations.
Important
Structs work best with value types (like int, float, Vector2); using reference types in structs can cause boxing operations that negate the performance benefits. For more information on structs, refer to the Structure Types - C# Reference documentation on Microsoft Learn.
By tracking both the current (At) and target (To) positions, we can implement smooth visual movement between grid positions, creating more fluid animations than the traditional stutter step movement seen in classic snake games. We will explore this concept a little further in this chapter.
The Slime Class
Next, let's implement a class to encapsulate the properties and functionality of our snake-like slime. In the GameObjects directory of the DungeonSlime project (your main game project), create a new file named Slime.cs and add the following initial code:
using System;
using System.Collections.Generic;
using Microsoft.Xna.Framework;
using MonoGameLibrary;
using MonoGameLibrary.Graphics;

namespace DungeonSlime.GameObjects;

public class Slime
{

}
This code sets up the basic structure for our Slime class. We've added the necessary using statements to access MonoGame's framework components and placed the class in the DungeonSlime.GameObjects namespace to keep our code organized. The empty class will serve as our foundation, and we'll build it up piece by piece in the following sections.
Now, we'll add several components to this class in sequence. Each section below should be added to the Slime class in the order presented. As we go through each part, the class will gradually take shape to handle all the snake-like behavior we need.
Note
When adding these sections one by one, you may see compiler errors until all sections are in place. This is normal, as some parts of the code will reference fields or methods that haven't been added yet. Once all sections are complete, these errors will resolve.
Slime Fields
Add the following fields to the Slime class:
// A constant value that represents the amount of time to wait between
// movement updates.
private static readonly TimeSpan s_movementTime = TimeSpan.FromMilliseconds(200);

// The amount of time that has elapsed since the last movement update.
private TimeSpan _movementTimer;

// Normalized value (0-1) representing progress between movement ticks for visual interpolation
private float _movementProgress;

// The next direction to apply to the head of the slime chain during the
// next movement update.
private Vector2 _nextDirection;

// The number of pixels to move the head segment during the movement cycle.
private float _stride;

// Tracks the segments of the slime chain.
private List<SlimeSegment> _segments;

// The AnimatedSprite used when drawing each slime segment
private AnimatedSprite _sprite;
Let's break down what each of these fields is responsible for:
s_movementTime: This constant represents how long the slime waits between movement cycles (300ms). This creates the classic snake game's grid-based movement feel, where the snake moves at regular intervals rather than continuously._movementTime: This field accumulates elapsed time until it reaches the movement threshold. When it does, the slime moves one grid cell and the timer resets._movementProgress: This normalized value (0-1) represents progress between movement ticks and is used for visual interpolation. It allows us to smoothly animate the slime's movement between grid positions._nextDirection: This stores the direction that will be applied to the head segment during the next movement cycle._stride: This represents the total number of pixels the head segment should move during movement cycles._segments: This collection holds all theSlimeSegmentstructures that make up the slime's body. The first segment is the head, and the rest form the trailing body._sprite: This stores theAnimatedSpritethat is used to draw each segment of the slime.
These fields implement core snake-like mechanics - the timed interval movement, direction control, and the segmented body that forms the snake.
Slime Events
Next, add the following events to the Slime class after the fields:
/// <summary>
/// Event that is raised if it is detected that the head segment of the slime
/// has collided with a body segment.
/// </summary>
public event EventHandler BodyCollision;
This event will allow the Slime class to notify the game scene when the head of the slime collides with another segment, triggering a game over.
Slime Constructor
After the events, add the following constructor to the Slime class:
/// <summary>
/// Creates a new Slime using the specified animated sprite.
/// </summary>
/// <param name="sprite">The AnimatedSprite to use when drawing the slime.</param>
public Slime(AnimatedSprite sprite)
{
    _sprite = sprite;
}
This is a simple constructor that requires the slime to be given the AnimatedSprite that will be used to draw each of the slime segments.
Slime Initialization
Add the following Initialization method to the Slime class after the constructor:
/// <summary>
/// Initializes the slime, can be used to reset it back to an initial state.
/// </summary>
/// <param name="startingPosition">The position the slime should start at.</param>
/// <param name="stride">The total number of pixels to move the head segment during each movement cycle.</param>
public void Initialize(Vector2 startingPosition, float stride)
{
    // Initialize the segment collection.
    _segments = new List<SlimeSegment>();

    // Set the stride
    _stride = stride;

    // Create the initial head of the slime chain.
    SlimeSegment head = new SlimeSegment();
    head.At = startingPosition;
    head.To = startingPosition + new Vector2(_stride, 0);
    head.Direction = Vector2.UnitX;

    // Add it to the segment collection.
    _segments.Add(head);

    // Set the initial next direction as the same direction the head is
    // moving.
    _nextDirection = head.Direction;

    // Zero out the movement timer.
    _movementTimer = TimeSpan.Zero;
}
With this method, we can initialize, or reset the state of slime. It:
- Instantiates a new segment collection.
- Creates the initial head segment and positions it at the specific
startingPosition. - Sets the initial direction to be to the right.
- Initialize the movement timer to zero.
Slime Input Handling
Next, let's add the HandleInput method to process player input. Add the following method after the Initialize method:
private void HandleInput()
{
    Vector2 potentialNextDirection = _nextDirection;

    if (GameController.MoveUp())
    {
        potentialNextDirection = -Vector2.UnitY;
    }
    else if (GameController.MoveDown())
    {
        potentialNextDirection = Vector2.UnitY;
    }
    else if (GameController.MoveLeft())
    {
        potentialNextDirection = -Vector2.UnitX;
    }
    else if (GameController.MoveRight())
    {
        potentialNextDirection = Vector2.UnitX;
    }

    // Only allow direction change if it is not reversing the current
    // direction.  This prevents the slime from backing into itself.
    float dot = Vector2.Dot(potentialNextDirection, _segments[0].Direction);
    if (dot >= 0)
    {
        _nextDirection = potentialNextDirection;
    }
}
This method will:
- Determine if the player is attempting to change directions instead of directly moving the slime. This direction change will be applied later during the movement cycle update.
- Uses Vector2.Dot to prevent the slime from reversing into itself, causing an immediate collision and game over state.
- Updates the
_nextDirectionvalue only if the direction input is valid.
Note
The dot product measures how much two vectors point in the same direction. It is:
- Positive if they are pointing in the same direction.
- Negative if they are pointing in opposite directions.
- Zero when they are perpendicular.
By using dot product here, this effectively implements the classic snake-like game rule that you cannot turn 180° into yourself.
Slime Movement Cycle
To handle the snake-like movement cycle of the slime, we will create a method called Move. Add the following method to the Slime class after the HandleInput method:
private void Move()
{
    // Capture the value of the head segment
    SlimeSegment head = _segments[0];

    // Update the direction the head is supposed to move in to the
    // next direction cached.
    head.Direction = _nextDirection;

    // Update the head's "at" position to be where it was moving "to"
    head.At = head.To;

    // Update the head's "to" position to the next tile in the direction
    // it is moving.
    head.To = head.At + head.Direction * _stride;

    // Insert the new adjusted value for the head at the front of the
    // segments and remove the tail segment. This effectively moves
    // the entire chain forward without needing to loop through every
    // segment and update its "at" and "to" positions.
    _segments.Insert(0, head);
    _segments.RemoveAt(_segments.Count - 1);

    // Iterate through all of the segments except the head and check
    // if they are at the same position as the head. If they are, then
    // the head is colliding with a body segment and a body collision
    // has occurred.
    for (int i = 1; i < _segments.Count; i++)
    {
        SlimeSegment segment = _segments[i];

        if (head.At == segment.At)
        {
            if(BodyCollision != null)
            {
                BodyCollision.Invoke(this, EventArgs.Empty);
            }

            return;
        }
    }
}
This method performs the core snake-like movement cycle logic by:
- Copying the value of the current head segment.
- Updating the copy's position (
At) to where the head was moving to and updating the position it is moving to (To). - Insert the copy into the front of the segment collection and remove the tail.
- Check if the head is now in the same position as any body segments, which would cause a collision and trigger a game over.
Note
By inserting a new head segment at the front of the chain and removing the last segment, this creates the illusion of the entire chain moving forward as one, even though we're only actually moving the head forward and removing the tail.
This follows the common snake movement pattern as discussed in the Understanding Snake Game Mechanics: Movement Cycle section above.
Slime Growth
To handle the snake-like growth of the slime, we'll create a method called Grow. Add the following method to the Slime class after the Move method:
/// <summary>
/// Informs the slime to grow by one segment.
/// </summary>
public void Grow()
{
    // Capture the value of the tail segment
    SlimeSegment tail = _segments[_segments.Count - 1];

    // Create a new tail segment that is positioned a grid cell in the
    // reverse direction from the tail moving to the tail.
    SlimeSegment newTail = new SlimeSegment();
    newTail.At = tail.To + tail.ReverseDirection * _stride;
    newTail.To = tail.At;
    newTail.Direction = Vector2.Normalize(tail.At - newTail.At);

    // Add the new tail segment
    _segments.Add(newTail);
}
Let's break down how this method works:
- First it creates a copy of the current tail value.
- It then adjusts the values of the copy so that it is now positioned behind the current tail by using the
ReverseDirectionvalue of the tail. - Finally, it inserts this new tail into the segments collection.
Slime Update
With most of the core snake-like mechanics now added to the Slime class within their own methods, let's add the Update method. Add the following method to the Slime class after the Grow method:
/// <summary>
/// Updates the slime.
/// </summary>
/// <param name="gameTime">A snapshot of the timing values for the current update cycle.</param>
public void Update(GameTime gameTime)
{
    // Update the animated sprite.
    _sprite.Update(gameTime);

    // Handle any player input
    HandleInput();

    // Increment the movement timer by the frame elapsed time.
    _movementTimer += gameTime.ElapsedGameTime;

    // If the movement timer has accumulated enough time to be greater than
    // the movement time threshold, then perform a full movement.
    if (_movementTimer >= s_movementTime)
    {
        _movementTimer -= s_movementTime;
        Move();
    }

    // Update the movement lerp offset amount
    _movementProgress = (float)(_movementTimer.TotalSeconds / s_movementTime.TotalSeconds);
}
This update method:
- Updates the slime's
AnimatedSpriteto ensure the sprite animations occur. - Calls
HandleInputto check for player input - Increments the movement timer by the amount of time that has elapsed between the game's update cycles.
- Performs a check to see if the movement timer has accumulated more time than the threshold to perform a movement cycle update. If it has then
1. The movement timer is reduced by the threshold time.
2. The
Movemethod is called to perform a movement cycle update. - Finally, the movement progress amount is calculated by dividing the number of seconds accumulated for the movement timer by the number of seconds for the threshold. This gives us a normalized value between 0.0 and 1.0 that we can use for visual interpolation for fluid movement.
Tip
In games, frame rates can vary based on system performance, causing inconsistent update intervals. If we simply reset the movement timer to zero after each movement cycle, we would lose any excess time that accumulated beyond the movement threshold.
For example:
- Our movement threshold is 200ms.
- The game runs at 60fps (16.67ms per frame).
- After 12 frames, we have accumulated 200.04ms.
- If we reset to zero, we lose 0.04ms.
- Over time, these small losses can add up and cause inconsistent movement.
By subtracting the threshold instead of resetting to zero, we "bank" the excess time (0.06ms in this example) for the next movement cycle. This ensures that:
- Movement happens exactly at the intended frequency, maintaining consistent game speed.
- The visual smoothness of movement remains intact even if the game occasionally drops frames.
- Players experience the same game timing regardless of their hardware's performance.
This technique is standard practice in game development, especially for timing-sensitive mechanics like rhythmic games, animations, and movement systems. It is a simple solution that significantly improves gameplay consistency.
Slime Draw
We also need a method to handle drawing the slime and all of its segments. Add the following Draw method after the Update method to the Slime class:
/// <summary>
/// Draws the slime.
/// </summary>
public void Draw()
{
    // Iterate through each segment and draw it
    foreach (SlimeSegment segment in _segments)
    {
        // Calculate the visual position of the segment at the moment by
        // lerping between its "at" and "to" position by the movement
        // offset lerp amount
        Vector2 pos = Vector2.Lerp(segment.At, segment.To, _movementProgress);

        // Draw the slime sprite at the calculated visual position of this
        // segment
        _sprite.Draw(Core.SpriteBatch, pos);
    }
}
This draw method iterates each segment of the slime and calculates the visual position to draw each segment at by performing linear interpolation (lerp) to determine the position of the segment between its current position (At) and the position it is moving to (To) based on the _movementProgress calculation.
Note
Vector2.Lerp performs a linear interpolation between two vectors, creating a smooth transition from start to end based on an amount parameter. The formula is:
\(\text{result} = \text{start} + (\text{end} - \text{start}) \cdot \text{amount}\)
Where the amount parameter ranges from 0.0 (returns the start position) to 1.0 (returns the end position). Values between 0.0 and 1.0 give positions along the straight line between start and end.
In our game, this is used to create a visual fluid movement illusion by interpolating between a segment's current position (At) and its target position (To) based on the elapsed time, rather than having the segments abruptly jump from one grid position to the next after each movement update.
Slime Bounds
For the game scene to detect collisions between the slime and other elements (walls or the bat), we need a method to calculate the current collision bounds. Add the following method to the Slime class after the Draw method:
/// <summary>
/// Returns a Circle value that represents collision bounds of the slime.
/// </summary>
/// <returns>A Circle value.</returns>
public Circle GetBounds()
{
    SlimeSegment head = _segments[0];

    // Calculate the visual position of the head at the moment of this
    // method call by lerping between the "at" and "to" position by the
    // movement offset lerp amount
    Vector2 pos = Vector2.Lerp(head.At, head.To, _movementProgress);

    // Create the bounds using the calculated visual position of the head.
    Circle bounds = new Circle(
        (int)(pos.X + (_sprite.Width * 0.5f)),
        (int)(pos.Y + (_sprite.Height * 0.5f)),
        (int)(_sprite.Width * 0.5f)
    );

    return bounds;
}
This method takes the current head segment (the first segment in our collection), calculates its visual position using linear interpolation, and then creates a Circle value to represent its collision boundary. Using the interpolated position ensures that collision detection aligns with what the player sees on screen.
Note
We only need collision bounds for the slime's head for interactions with the bat and walls, as this matches the classic snake game mechanic where only the head's collisions matter for gameplay. For detecting collisions between the head and body segments, we use a simpler position-based check in the Move method since those positions are always aligned to the grid.
With all these methods in place, our Slime class now fully implements the snake-like mechanics we need. It handles movement on a grid, prevents invalid direction changes, detects self-collisions, and provides smooth visual movement between grid positions. This encapsulation allows us to manage all slime-related behavior in one place while exposing only the necessary interfaces to the game scene.
Now that we have our player-controlled character implemented, let's create the object that the slime will try to collect; the bat.
The Bat Class
In the GameObjects directory of the DungeonSlime project (your main game project), create a new file named Bat.cs and add the following initial code:
using System;
using Microsoft.Xna.Framework;
using Microsoft.Xna.Framework.Audio;
using MonoGameLibrary;
using MonoGameLibrary.Graphics;

namespace DungeonSlime.GameObjects;

public class Bat
{

}
This code establishes the foundation for our Bat class. We have included the necessary using statements for MonoGame components, audio functionality, and our library references. The class is placed in the same DungeonSlime.GameObjects namespace as our Slime class to maintain a consistent organization.
Now we will build this class step by step, adding all the functionality needed for the bat to serve as the collectible object in our game. Add each of the following sections to the Bat class in the order they are presented.
Note
As with the Slime class, you may encounter compiler errors until all sections are in place. These errors will be resolved once all components of the class have been added.
Bat Fields
Add the following fields to the Bat class:
private const float MOVEMENT_SPEED = 5.0f;

// The velocity of the bat that defines the direction and how much in that
// direction to update the bats position each update cycle.
private Vector2 _velocity;

// The AnimatedSprite used when drawing the bat.
private AnimatedSprite _sprite;

// The sound effect to play when the bat bounces off the edge of the room.
private SoundEffect _bounceSoundEffect;
Let's break down what each of these fields is responsible for:
MOVEMENT_SPEED: This constant represents the factor to multiply the velocity vector by to determine how fast the bat is moving._velocity: A vector that defines the direction and how much in that direction to update the position of the bat each update cycle._sprite: This stores theAnimatedSpritethat is used to draw the bat._bounceSoundEffect: This store the SoundEffect to play when the bat is told to bounce.
Bat Properties
Next, add the following property to the Bat class after the fields:
/// <summary>
/// Gets or Sets the position of the bat.
/// </summary>
public Vector2 Position { get; set;}
This property exposes the position of the bat so it can be used for calculations in the game scene when determining where to place the bat after the slime eats it.
Bat Constructor
After the property, dd the following constructor to the Bat class:
/// <summary>
/// Creates a new Bat using the specified animated sprite and sound effect.
/// </summary>
/// <param name="sprite">The AnimatedSprite ot use when drawing the bat.</param>
/// <param name="bounceSoundEffect">The sound effect to play when the bat bounces off a wall.</param>
public Bat(AnimatedSprite sprite, SoundEffect bounceSoundEffect)
{
    _sprite = sprite;
    _bounceSoundEffect = bounceSoundEffect;
}
This is a simple constructor that requires the bat to be given the AnimatedSprite that will be used to draw the bat and the SoundEffect to be played when the bat bounces off a wall.
Bat Randomize Velocity
Currently, we have the AssignRandomVelocity method in the GameScene that we call to randomize the velocity of the bat after it has been eaten by the slime. Let's take this method out of the GameScene class and put it into the Bat class itself. Add the following method to the Bat class after the constructor:
/// <summary>
/// Randomizes the velocity of the bat.
/// </summary>
public void RandomizeVelocity()
{
    // Generate a random angle
    float angle = (float)(Random.Shared.NextDouble() * MathHelper.TwoPi);

    // Convert the angle to a direction vector
    float x = (float)Math.Cos(angle);
    float y = (float)Math.Sin(angle);
    Vector2 direction = new Vector2(x, y);

    // Multiply the direction vector by the movement speed to get the
    // final velocity
    _velocity = direction * MOVEMENT_SPEED;
}
Bat Bounce
We are also going to take the logic from the GameScene class that bounces the bat off the walls and move it into a dedicated method in the Bat class. Add the following method to the Bat class after the RandomizeVelocity method:
/// <summary>
/// Handles a bounce event when the bat collides with a wall or boundary.
/// </summary>
/// <param name="normal">The normal vector of the surface the bat is bouncing against.</param>
public void Bounce(Vector2 normal)
{
    Vector2 newPosition = Position;

    // Adjust the position based on the normal to prevent sticking to walls.
    if(normal.X != 0)
    {
        // We are bouncing off a vertical wall (left/right).
        // Move slightly away from the wall in the direction of the normal.
        newPosition.X += normal.X * (_sprite.Width * 0.1f);
    }

    if(normal.Y != 0)
    {
        // We are bouncing off a horizontal wall (top/bottom).
        // Move slightly way from the wall in the direction of the normal.
        newPosition.Y += normal.Y * (_sprite.Height * 0.1f);
    }

    // Apply the new position
    Position = newPosition;

    // Apply reflection based on the normal.
    _velocity = Vector2.Reflect(_velocity, normal);

    // Play the bounce sound effect.
    Core.Audio.PlaySoundEffect(_bounceSoundEffect);
}
This method only takes a single parameter, the normal vector of the surface the bat is bouncing against. Based on the X and Y components of the normal vector, we can determine which wall the bat bounced against and adjust the position of the bat so that it doesn't stick to the wall.
Bat Bounds
Similar to the Slime class, for the game scene to detect collision between the bat and other elements, we need a method to calculate the current collision bounds of the bat. Add the following method to the Bat class after the Bounce method:
/// <summary>
/// Returns a Circle value that represents collision bounds of the bat.
/// </summary>
/// <returns>A Circle value.</returns>
public Circle GetBounds()
{
    int x = (int)(Position.X + _sprite.Width * 0.5f);
    int y = (int)(Position.Y + _sprite.Height * 0.5f);
    int radius = (int)(_sprite.Width * 0.25f);

    return new Circle(x, y, radius);
}
Bat Update
The Bat class will also need to be updated. Add the following Update method to the Bat class after the GetBounds method:
/// <summary>
/// Updates the bat.
/// </summary>
/// <param name="gameTime">A snapshot of the timing values for the current update cycle.</param>
public void Update(GameTime gameTime)
{
    // Update the animated sprite
    _sprite.Update(gameTime);

    // Update the position of the bat based on the velocity.
    Position += _velocity;
}
This method simply updates the bat's AnimatedSprite to ensure animations occur and adjusts the position of the bat based on the current velocity.
Note
The continuous movement of the bat contrasts with the grid-based interval movement of the slime, creating different gameplay dynamics for the player to consider. This makes catching the bat challenging without requiring any complex behaviors.
Bat Draw
Finally, we need a method to draw the bat. Add the following Draw method to the Bat class after the Update method:
/// <summary>
/// Draws the bat.
/// </summary>
public void Draw()
{
    _sprite.Draw(Core.SpriteBatch, Position);
}
This method simply draws the bat's AnimatedSprite at the bat's current position.
With the Bat class complete, we've now encapsulated all the behavior needed for the collectible element in our game. The bat moves continuously around the screen and can bounce off walls, adding a twist on the classic snake-like mechanic by creating a target for the player to chase.
Conclusion
In this chapter, we have learned about and implemented the core mechanics of a class snake-like game. We created:
- A
GameControllerclass that provides a unified input interface, separating game actions from specific input devices. - A
SlimeSegmentstruct to efficiently store and manage individual segments of our snake-like character. - A
Slimeclass that implements grid-based movement, segment management and self-collision detection. - A
Batclass that serves as the collectible object with continuous movement and wall bouncing.
These implementations encapsulate the core gameplay mechanics into reusable, maintainable objects. In the next chapter, we will build on these mechanics by updating the GameScene to implement game state management and a new UI element for the game over state to create a complete game experience.
Test Your Knowledge
Why must a snake-like game prevent the player from reversing direction?
Preventing reverse movement is necessary because it would cause an immediate collision between the snake's head and the first body segment, resulting in an unfair game over.
How does the movement cycle for a snake work, and why is it more efficient than updating each segment individually?
The snake movement cycle works by:
- Creating a copy of the head segment.
- Positioning the copy one grid cell ahead in the current direction
- Inserting this copy at the front of the segment collection
- Removing the last segment.
This approach is more efficient because it only requires manipulating two segments (adding a new head and removing the tail) regardless of how long the snake becomes, rather than iterating through and updating every segment individually.
What are the benefits of using the Input Abstraction pattern implemented in the
GameControllerclass?The Input Abstraction pattern provides several benefits:
- Input device independence, allowing the game to handle keyboard, gamepad, or other inputs through a unified interface
- Simplified input handling through clean API calls rather than checking multiple input combinations
- Easier implementation of key rebinding features by only needing to modify the GameController class
- Consistent input logic defined in a single location
- Better cross-platform compatibility by centralizing platform-specific input handling
How does the implementation use Vector2.Lerp to create smooth visual movement, and why is this important?
The implementation uses Vector2.Lerp to interpolate between a segment's current position (
At) and its target position (To) based on a normalized movement progress value. This creates smooth visual movement by drawing the segments at intermediate positions between grid points rather than abruptly jumping from one grid position to the next.This is important because it provides more fluid animation while maintaining the logical grid-based movement, enhancing the visual quality of the game without changing the core mechanics.