Chapter 13: Working with Tilemaps
Learn how to implement tile-based game environments using tilemaps and tilesets, including creating reusable classes for managing tiles and loading level designs from XML configuration files.
In the previous chapters, you've learned how to draw individual sprites and animated sprites from a texture atlas and handle collision detection. However, the game so far is lacking an actual world or environment to exist in; it's just sprites on a cornflower blue background. Most 2D games feature game worlds built from many tiles arranged in a grid-like patten. These tilemaps allow you to efficiently create large game environments without managing thousands of individual sprites.
In this chapter you will:
- Learn what tilemaps are and how they're used in game development.
- Create a
Tilesetclass to manage collections of related tiles. - Build a
Tilemapclass to render tile-based game worlds. - Implement an XML-based tilemap loading system.
- Update our game to use tilemaps for the game environment.
Understanding Tilemaps
Tilemaps are a common technique used in 2D game development to create game worlds. Instead of positioning individual sprites for each element in the game world, a tilemap divides the world into a grid and places tiles from a tileset at each grid position.
What is a Tileset?
A tileset is a collection of small images (tiles) that can be combined and arranged to create game environments. Typically these are stored in a single texture atlas, similar to how we've been handing sprites and animations. Common examples of tiles might include:
- Floor and ground tiles.
- Walls and obstacle tiles.
- Decorative elements like plants and furniture.
- Special tiles like doors, ladders, or water.
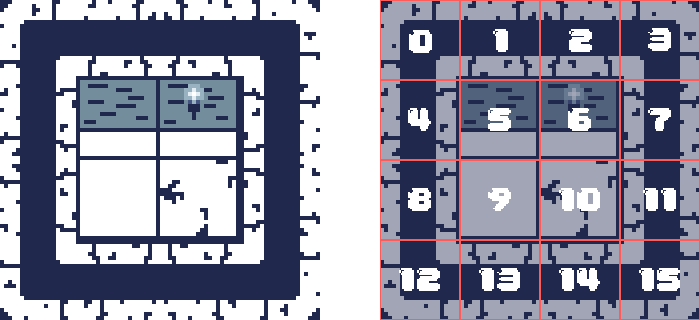
Each tile in a tileset is assigned an ID number, which the tilemap uses to reference which tile goes where. For example, in Figure 13-1 below, the tileset we'll add to our game in a moment is shown on the left and on the right is the same tileset with an overlay showing how each tile is assigned an ID number.
 |
|---|
| Figure 13-1: Left: Original dungeon tileset. Right: The same tileset with an overlay showing how each tile is assigned a numeric ID |
What is a Tilemap?
A tilemap is a grid-based data structure that defines while tiles from a tileset appear at each position in the game world. The tilemap stores an ID for each cell in the grid, where the ID corresponds to a specific tile in the tileset.
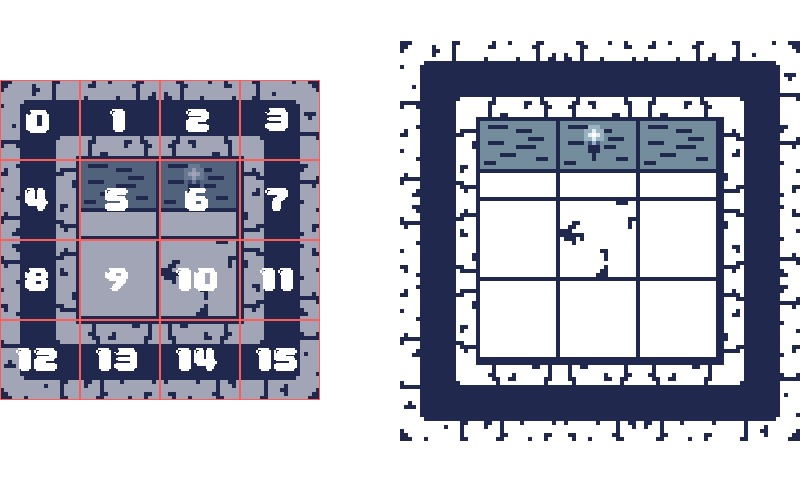
For example, a simple tilemap may look like this conceptually:
00 01 02 01 03
04 05 06 05 07
08 09 10 09 11
04 09 09 09 07
12 13 14 13 15
If we took the above tilemap data and mapped each cell to the tile in the related tileset, it would look something similar to Figure 13-2 below:
 |
|---|
| Figure 13-2: From tileset to tilemap. Left: Tileset with an overlay showing the tile IDs. Right: The tilemap created using the tiles arranged with the pattern from the code example above |
This approach offers several advantage:
- Memory efficiency: Instead of storing complete information about each tile's appearance, you only need to store a reference ID.
- Performance: Drawing a tilemap can be optimized to reduce texture swapping compared to rendering many individual sprites.
- Design flexibility: Tilemaps make it easy to create, modify, and load level designs from external files.
Let's implement this concept in our game by creating a Tileset class and a Tilemap class.
The Tileset Class
The Tileset class will manage a collection of tiles from a texture atlas. Each tile will be represented as a TextureRegion, building on the tools in the library we created earlier.
In the Graphics directory of the MonoGameLibrary project, create a new file named Tileset.cs with the following code as the initial structure:
namespace MonoGameLibrary.Graphics;

public class Tileset
{

}
Tileset Properties and Fields
The Tileset class needs to store a TextureRegion for each of the individual tiles in the tile set and provide the dimensions (with and height) of the tiles. It should also offers additional properties that provide the total number of rows and columns in the tileset and the total number of tiles. Add the following fields and properties:
private readonly TextureRegion[] _tiles;

/// <summary>
/// Gets the width, in pixels, of each tile in this tileset.
/// </summary>
public int TileWidth { get; }

/// <summary>
/// Gets the height, in pixels, of each tile in this tileset.
/// </summary>
public int TileHeight { get; }

/// <summary>
/// Gets the total number of columns in this tileset.
/// </summary>
public int Columns { get; }

/// <summary>
/// Gets the total number of rows in this tileset.
/// </summary>
public int Rows { get; }

/// <summary>
/// Gets the total number of tiles in this tileset.
/// </summary>
public int Count { get; }
Tileset Constructor
The Tileset class constructor should require a source TextureRegion that represents the tileset and the width and height of the tiles. Based on these parameters provided, it can automatically divide the source TextureRegion into a grid of smaller texture regions and calculate the total number of rows, columns, and tiles. Add the following constructor:
/// <summary>
/// Creates a new tileset based on the given texture region with the specified
/// tile width and height.
/// </summary>
/// <param name="textureRegion">The texture region that contains the tiles for the tileset.</param>
/// <param name="tileWidth">The width of each tile in the tileset.</param>
/// <param name="tileHeight">The height of each tile in the tileset.</param>
public Tileset(TextureRegion textureRegion, int tileWidth, int tileHeight)
{
    TileWidth = tileWidth;
    TileHeight = tileHeight;
    Columns = textureRegion.Width / tileWidth;
    Rows = textureRegion.Height / tileHeight;
    Count = Columns * Rows;

    // Create the texture regions that make up each individual tile
    _tiles = new TextureRegion[Count];

    for (int i = 0; i < Count; i++)
    {
        int x = i % Columns * tileWidth;
        int y = i / Columns * tileHeight;
        _tiles[i] = new TextureRegion(textureRegion.Texture, x, y, tileWidth, tileHeight);
    }
}
Tileset Methods
The Tileset class needs to provide methods to retrieve the TextureRegion of a tile based on the index (tile ID) or by the location (row and column) of the tile in the tileset. Add the following methods:
/// <summary>
/// Gets the texture region for the tile from this tileset at the given index.
/// </summary>
/// <param name="index">The index of the texture region in this tile set.</param>
/// <returns>The texture region for the tile form this tileset at the given index.</returns>
public TextureRegion GetTile(int index) => _tiles[index];

/// <summary>
/// Gets the texture region for the tile from this tileset at the given location.
/// </summary>
/// <param name="column">The column in this tileset of the texture region.</param>
/// <param name="row">The row in this tileset of the texture region.</param>
/// <returns>The texture region for the tile from this tileset at given location.</returns>
public TextureRegion GetTile(int column, int row)
{
    int index = row * Columns + column;
    return GetTile(index);
}
The Tilemap Class
Now that we have a Tileset class to define our tile collection, we need a Tilemap class to arrange these tiles into a game level. The Tilemap class will store which tile goes where in our game world and provide methods to draw the entire map.
In the Graphics directory of the MonoGameLibrary project, create a new file named Tilemap.cs with the following code as the initial structure:
using System;
using System.IO;
using System.Xml;
using System.Xml.Linq;
using Microsoft.Xna.Framework;
using Microsoft.Xna.Framework.Content;
using Microsoft.Xna.Framework.Graphics;

namespace MonoGameLibrary.Graphics;

public class Tilemap
{

}
Tilemap Properties and Fields
The Tilemap class needs to store a reference to the tileset being used, along with an array of the tile IDs representing each tile in the map. It should also offer additional properties that provide the total number of rows and columns are in the tilemap and the total number of tiles. Add the following fields and properties:
private readonly Tileset _tileset;
private readonly int[] _tiles;

/// <summary>
/// Gets the total number of rows in this tilemap.
/// </summary>
public int Rows { get; }

/// <summary>
/// Gets the total number of columns in this tilemap.
/// </summary>
public int Columns { get; }

/// <summary>
/// Gets the total number of tiles in this tilemap.
/// </summary>
public int Count { get; }

/// <summary>
/// Gets the size of each tile in this tilemap.
/// </summary>
public int TileSize { get; }
Tilemap Constructor
The Tilemap constructor should require the Tilemap to reference for each tile, the total number of columns and rows in the map, and the size (width and height) of each tile. Add the following constructor:
/// <summary>
/// Creates a new tilemap.
/// </summary>
/// <param name="tileset">The tileset used by this tilemap.</param>
/// <param name="columns">The total number of columns in this tilemap.</param>
/// <param name="rows">The total number of rows in this tilemap.</param>
/// <param name="tileSize">The size of each tile in this tilemap.</param>
public Tilemap(Tileset tileset, int columns, int rows, int tileSize)
{
    _tileset = tileset;
    Rows = rows;
    Columns = columns;
    Count = Columns * Rows;
    TileSize = tileSize;
    _tiles = new int[Count];
}
Tilemap Tile Management Methods
The Tilemap class should provide methods to set and retrieve tiles, either by index or location (rows and column). Add the following methods:
/// <summary>
/// Sets the tile at the given index in this tilemap to use the tile from
/// the tileset at the specified tileset id.
/// </summary>
/// <param name="index">The index of the tile in this tilemap.</param>
/// <param name="tilesetID">The tileset id of the tile from the tileset to use.</param>
public void SetTile(int index, int tilesetID)
{
    _tiles[index] = tilesetID;
}

/// <summary>
/// Sets the tile at the given column and row in this tilemap to use the tile
/// from the tileset at the specified tileset id.
/// </summary>
/// <param name="column">The column of the tile in this tilemap.</param>
/// <param name="row">The row of the tile in this tilemap.</param>
/// <param name="tilesetID">The tileset id of the tile from the tileset to use.</param>
public void SetTile(int column, int row, int tilesetID)
{
    int index = row * Columns + column;
    SetTile(index, tilesetID);
}

/// <summary>
/// Gets the texture region of the tile from this tilemap at the specified index.
/// </summary>
/// <param name="index">The index of the tile in this tilemap.</param>
/// <returns>The texture region of the tile from this tilemap at the specified index.</returns>
public TextureRegion GetTile(int index)
{
    return _tileset.GetTile(_tiles[index]);
}

/// <summary>
/// Gets the texture region of the tile frm this tilemap at the specified
/// column and row.
/// </summary>
/// <param name="column">The column of the tile in this tilemap.</param>
/// <param name="row">The row of hte tile in this tilemap.</param>
/// <returns>The texture region of the tile from this tilemap at the specified column and row.</returns>
public TextureRegion GetTile(int column, int row)
{
    int index = row * Columns + column;
    return GetTile(index);
}
Tilemap Draw Method
The Tilemap class should provide a method to draw the tilemap by iterating through each of the tiles and drawing the TextureRegion for that tile at its correct position. Add the following method:
/// <summary>
/// Draws this tilemap using the given sprite batch.
/// </summary>
/// <param name="spriteBatch">The sprite batch used to draw this tilemap.</param>
public void Draw(SpriteBatch spriteBatch)
{
    for (int i = 0; i < Count; i++)
    {
        int tileSetIndex = _tiles[i];
        TextureRegion tile = _tileset.GetTile(tileSetIndex);

        int x = i % Columns;
        int y = i / Columns;

        Vector2 position = new Vector2(x * TileSize, y * TileSize);
        tile.Draw(spriteBatch, position, Color.White);
    }
}
Tilemap FromFile Method
The Tilemap class should also provide a method to load and create an instance of the tilemap from an external configuration file. This allows us to separate level design from code. Add the following method:
/// <summary>
/// Creates a new tilemap based on a tilemap xml configuration file.
/// </summary>
/// <param name="content">The content manager used to load the texture for the tileset.</param>
/// <param name="filename">The path to the xml file, relative to the content root directory.</param>
/// <returns>The tilemap created by this method.</returns>
public static Tilemap FromFile(ContentManager content, string filename)
{
    string filePath = Path.Combine(content.RootDirectory, filename);

    using (Stream stream = TitleContainer.OpenStream(filePath))
    {
        using (XmlReader reader = XmlReader.Create(stream))
        {
            XDocument doc = XDocument.Load(reader);
            XElement root = doc.Root;

            // The <Tilemap> element contains an attribute that specifies the
            // size of each tile in the tilemap
            int tileSize = int.Parse(root.Attribute("tileSize")?.Value ?? "0");

            // The <Tileset> element contains the information about the tileset
            // used by the tilemap.
            //
            // Example
            // <Tileset region="0 0 100 100" tileWidth="10" tileHeight="10">contentPath</Tileset>
            //
            // The region attribute represents the x, y, width, and height
            // components of the boundary for the texture region within the
            // texture at the contentPath specified.
            //
            // the tileWidth and tileHeight attributes specify the width and
            // height of each tile in the tileset.
            //
            // the contentPath value is the contentPath to the texture to
            // load that contains the tileset
            XElement tilesetElement = root.Element("Tileset");

            string regionAttribute = tilesetElement.Attribute("region").Value;
            string[] split = regionAttribute.Split(" ", StringSplitOptions.RemoveEmptyEntries);
            int x = int.Parse(split[0]);
            int y = int.Parse(split[1]);
            int width = int.Parse(split[2]);
            int height = int.Parse(split[3]);

            int tileWidth = int.Parse(tilesetElement.Attribute("tileWidth").Value);
            int tileHeight = int.Parse(tilesetElement.Attribute("tileHeight").Value);
            string contentPath = tilesetElement.Value;

            // Load the texture 2d at the content path
            Texture2D texture = content.Load<Texture2D>(contentPath);

            // Create the texture region from the texture
            TextureRegion textureRegion = new TextureRegion(texture, x, y, width, height);

            // Create the tileset using the texture region
            Tileset tileset = new Tileset(textureRegion, tileWidth, tileHeight);

            // The <Tiles> element contains lines of strings where each line
            // represents a row in the tilemap.  Each line is a space
            // separated string where each element represents a column in that
            // row.  The value of the column is the id of the tile in the
            // tileset to draw for that location.
            //
            // Example:
            // <Tiles>
            //      00 01 01 02
            //      03 04 04 05
            //      03 04 04 05
            //      06 07 07 08
            // </Tiles>
            XElement tilesElement = root.Element("Tiles");

            // Split the value of the tiles data into rows by splitting on
            // the new line character
            string[] rows = tilesElement.Value.Trim().Split('\n', StringSplitOptions.RemoveEmptyEntries);

            // Split the value of the first row to determine the total number of columns
            int columnCount = rows[0].Split(" ", StringSplitOptions.RemoveEmptyEntries).Length;

            // Create the tilemap
            Tilemap tilemap = new Tilemap(tileset, columnCount, rows.Length, tileSize);

            // Process each row
            for (int row = 0; row < rows.Length; row++)
            {
                // Split the row into individual columns
                string[] columns = rows[row].Trim().Split(" ", StringSplitOptions.RemoveEmptyEntries);

                // Process each column of the current row
                for (int column = 0; column < columnCount; column++)
                {
                    // Get the tileset index for this location
                    int tilesetIndex = int.Parse(columns[column]);

                    // Get the texture region of that tile from the tileset
                    TextureRegion region = tileset.GetTile(tilesetIndex);

                    // Add that region to the tilemap at the row and column location
                    tilemap.SetTile(column, row, tilesetIndex);
                }
            }

            return tilemap;
        }
    }
}
Updating the Game
Now that we have the Tilemap and Tileset classes defined, let's update our game to use them. We'll need to
- Update the texture atlas to include the tileset.
- Create a tilemap xml configuration file.
- Update the game to load the tilemap from the configuration file and draw it.
Update the Texture Atlas
Currently, the texture atlas we've been using only contains the sprites for the slime and bat animations. Let's update it to a new version that contains the tileset as well. Download the new texture atlas below by right-clicking the following image and saving it as atlas.png in the Content/images directory of the game project, overwriting the existing one.
 |
|---|
| Figure 13-3: The texture atlas for our game updated to include the tileset for the tilemap |
Since the texture atlas image was updated and the location of the slime and bat sprites were repositioned, we need to update the atlas configuration file as well. Open the atlas-definition.xml configuration file and update it to the following:
<?xml version="1.0" encoding="utf-8"?>
<TextureAtlas>
    <Texture>images/atlas</Texture>
    <Regions>
        <Region name="slime-1" x="320" y="0" width="80" height="80" />
        <Region name="slime-2" x="320" y="80" width="80" height="80" />
        <Region name="bat-1" x="320" y="160" width="80" height="80" />
        <Region name="bat-2" x="320" y="240" width="80" height="80" />
        <Region name="bat-3" x="400" y="0" width="80" height="80" />
    </Regions>
    <Animations>
        <Animation name="slime-animation" delay="200">
            <Frame region="slime-1" />
            <Frame region="slime-2" />
        </Animation>
        <Animation name="bat-animation" delay="200">
            <Frame region="bat-1" />
            <Frame region="bat-2" />
            <Frame region="bat-1" />
            <Frame region="bat-3" />
        </Animation>
    </Animations>
</TextureAtlas>
This change just adjusts the x and y coordinate positions to match the new locations of the slime and bat sprites in the atlas.
Creating a Tilemap XML Configuration
Now that we have the texture atlas updated to include the tileset, let's create a tilemap configuration that our game can load. The configuration will be an XML file that specifies the tileset to use and the arrangement of tiles in the tilemap.
Create a new file named tilemap-definition.xml in the Content/images directory of the game project and add the following:
<?xml version="1.0" encoding="utf-8"?>
<Tilemap tileSize="80">
    <Tileset region="0 0 320 320" tileWidth="80" tileHeight="80">images/atlas</Tileset>
    <Tiles>
        00 01 02 01 02 01 02 01 02 01 02 01 02 01 02 03
        04 05 05 06 05 05 06 05 05 06 05 05 06 05 05 07
        08 09 09 09 09 09 09 09 09 09 09 09 09 09 09 11
        04 09 09 09 09 09 09 09 10 09 09 09 09 10 09 07
        08 09 10 09 09 09 09 09 09 09 09 09 09 09 09 11
        04 09 09 09 09 09 09 09 09 09 09 09 09 09 09 07
        08 10 09 09 09 09 09 09 09 09 10 09 09 09 09 11
        04 09 09 09 09 09 10 09 09 09 09 09 09 09 09 07
        12 13 14 13 14 13 14 13 14 13 14 13 14 13 14 15
    </Tiles>
</Tilemap>
This tilemap configuration creates a simple dungeon layout with walls around the perimeter and an open floor in the middle. The tile IDs correspond to specific tiles in the tileset:
00,03,12,15: Corner wall tiles (top-left, top-right, bottom-left, bottom-right).01,02,13,14: Horizontal wall tiles (top and bottom walls).04,07,08,11: Vertical wall tiles (left and right walls).05and06: Top floor edge tiles.09: Standard floor tile.10: Decorated floor tile with a crack in it.
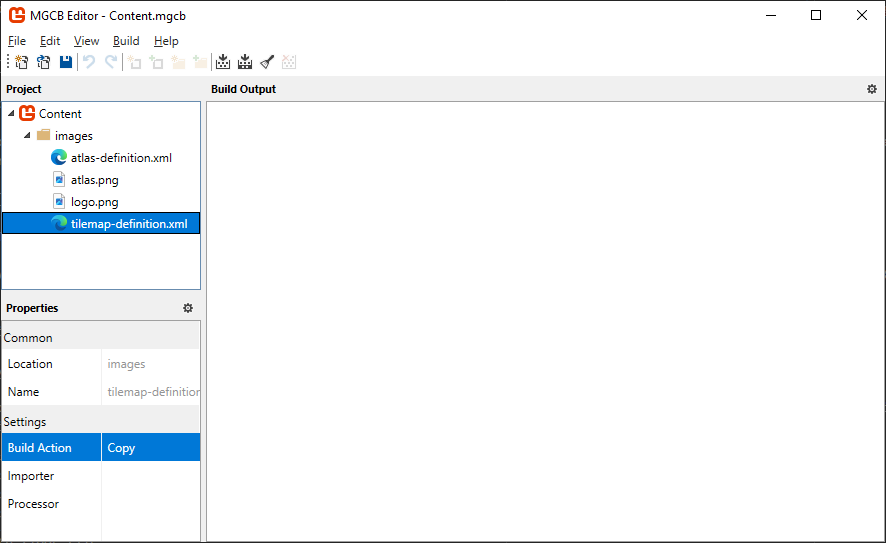
Next, we need to add this configuration file to our content project with the MGCB Editor:
- Open the Content.mgcb content project file in the MGCB Editor.
- Right-click the images folder and choose Add > Existing Item....
- Select the tilemap-definition.xml file you just created.
- In the Properties panel, change the Build Action property from Build to Copy.
- Save the changes in the MGCB Editor.
 |
|---|
| Figure 13-4: The Content project in the MGCB Editor with the tilemap-definition.xml file added and the Build Action property set to copy |
Update the Game1 Class
With all of the assets now in place and configured, let's update the Game1 class to load the tilemap and draw it. We'll also need to update the collision logic so that the boundary is no longer the edge of the screen, but instead the edges of the wall tiles of the tilemap. Open Game1.cs and make the following updates:
using System;
using Microsoft.Xna.Framework;
using Microsoft.Xna.Framework.Graphics;
using Microsoft.Xna.Framework.Input;
using MonoGameLibrary;
using MonoGameLibrary.Graphics;
using MonoGameLibrary.Input;

namespace DungeonSlime;

public class Game1 : Core
{
    // Defines the slime animated sprite.
    private AnimatedSprite _slime;

    // Defines the bat animated sprite.
    private AnimatedSprite _bat;

    // Tracks the position of the slime.
    private Vector2 _slimePosition;

    // Speed multiplier when moving.
    private const float MOVEMENT_SPEED = 5.0f;

    // Tracks the position of the bat.
    private Vector2 _batPosition;

    // Tracks the velocity of the bat.
    private Vector2 _batVelocity;

    // Defines the tilemap to draw.
    private Tilemap _tilemap;

    // Defines the bounds of the room that the slime and bat are contained within.
    private Rectangle _roomBounds;

    public Game1() : base("Dungeon Slime", 1280, 720, false)
    {

    }

    protected override void Initialize()
    {
        base.Initialize();

        Rectangle screenBounds = GraphicsDevice.PresentationParameters.Bounds;

        _roomBounds = new Rectangle(
            _tilemap.TileSize,
            _tilemap.TileSize,
            screenBounds.Width - _tilemap.TileSize * 2,
            screenBounds.Height - _tilemap.TileSize * 2
        );

        // Initial slime position will be the center tile of the tile map.
        int centerRow = _tilemap.Rows / 2;
        int centerColumn = _tilemap.Columns / 2;
        _slimePosition = new Vector2(centerColumn, centerRow) * _tilemap.TileSize;

        // Initial bat position will the in the top left corner of the room
        _batPosition = new Vector2(_roomBounds.Left, _roomBounds.Top);

        // Assign the initial random velocity to the bat.
        AssignRandomBatVelocity();
    }

    protected override void LoadContent()
    {
        // Create the texture atlas from the XML configuration file
        TextureAtlas atlas = TextureAtlas.FromFile(Content, "images/atlas-definition.xml");

        // Create the slime animated sprite from the atlas.
        _slime = atlas.CreateAnimatedSprite("slime-animation");

        // Create the bat animated sprite from the atlas.
        _bat = atlas.CreateAnimatedSprite("bat-animation");

        // Create the tilemap from the XML configuration file.
        _tilemap = Tilemap.FromFile(Content, "images/tilemap-definition.xml");

        base.LoadContent();
    }

    protected override void Update(GameTime gameTime)
    {
        if (GamePad.GetState(PlayerIndex.One).Buttons.Back == ButtonState.Pressed || Keyboard.GetState().IsKeyDown(Keys.Escape))
            Exit();

        // Update the slime animated sprite.
        _slime.Update(gameTime);

        // Update the bat animated sprite.
        _bat.Update(gameTime);

        // Check for keyboard input and handle it.
        CheckKeyboardInput();

        // Check for gamepad input and handle it.
        CheckGamePadInput();

        // Creating a bounding circle for the slime
        Circle slimeBounds = new Circle(
            (int)(_slimePosition.X + (_slime.Width * 0.5f)),
            (int)(_slimePosition.Y + (_slime.Height * 0.5f)),
            (int)(_slime.Width * 0.5f)
        );

        // Use distance based checks to determine if the slime is within the
        // bounds of the game screen, and if it's outside that screen edge,
        // move it back inside.
        if (slimeBounds.Left < _roomBounds.Left)
        {
            _slimePosition.X = _roomBounds.Left;
        }
        else if (slimeBounds.Right > _roomBounds.Right)
        {
            _slimePosition.X = _roomBounds.Right - _slime.Width;
        }

        if (slimeBounds.Top < _roomBounds.Top)
        {
            _slimePosition.Y = _roomBounds.Top;
        }
        else if (slimeBounds.Bottom > _roomBounds.Bottom)
        {
            _slimePosition.Y = _roomBounds.Bottom - _slime.Height;
        }

        // Calculate the new position of the bat based on the velocity
        Vector2 newBatPosition = _batPosition + _batVelocity;

        // Create a bounding circle for the bat
        Circle batBounds = new Circle(
            (int)(newBatPosition.X + (_bat.Width * 0.5f)),
            (int)(newBatPosition.Y + (_bat.Height * 0.5f)),
            (int)(_bat.Width * 0.5f)
        );

        Vector2 normal = Vector2.Zero;

        // Use distance based checks to determine if the bat is within the
        // bounds of the game screen, and if it's outside that screen edge,
        // reflect it about the screen edge normal
        if (batBounds.Left < _roomBounds.Left)
        {
            normal.X = Vector2.UnitX.X;
            newBatPosition.X = _roomBounds.Left;
        }
        else if (batBounds.Right > _roomBounds.Right)
        {
            normal.X = -Vector2.UnitX.X;
            newBatPosition.X = _roomBounds.Right - _bat.Width;
        }

        if (batBounds.Top < _roomBounds.Top)
        {
            normal.Y = Vector2.UnitY.Y;
            newBatPosition.Y = _roomBounds.Top;
        }
        else if (batBounds.Bottom > _roomBounds.Bottom)
        {
            normal.Y = -Vector2.UnitY.Y;
            newBatPosition.Y = _roomBounds.Bottom - _bat.Height;
        }

        // If the normal is anything but Vector2.Zero, this means the bat had
        // moved outside the screen edge so we should reflect it about the
        // normal.
        if (normal != Vector2.Zero)
        {
            _batVelocity = Vector2.Reflect(_batVelocity, normal);
        }

        _batPosition = newBatPosition;

        if (slimeBounds.Intersects(batBounds))
        {
            // Divide the width  and height of the screen into equal columns and
            // rows based on the width and height of the bat.
            int totalColumns = GraphicsDevice.PresentationParameters.BackBufferWidth / (int)_bat.Width;
            int totalRows = GraphicsDevice.PresentationParameters.BackBufferHeight / (int)_bat.Height;

            // Choose a random row and column based on the total number of each
            // available within the bounds of the tilemap walls.
            int column = Random.Shared.Next(1, _tilemap.Columns - 1);
            int row = Random.Shared.Next(1, _tilemap.Rows - 1);

            // Change the bat position by setting the x and y values equal to
            // the column and row multiplied by the width and height.
            _batPosition = new Vector2(column * _bat.Width, row * _bat.Height);

            // Assign a new random velocity to the bat
            AssignRandomBatVelocity();
        }

        base.Update(gameTime);
    }

    private void AssignRandomBatVelocity()
    {
        // Generate a random angle
        float angle = (float)(Random.Shared.NextDouble() * Math.PI * 2);

        // Convert angle to a direction vector
        float x = (float)Math.Cos(angle);
        float y = (float)Math.Sin(angle);
        Vector2 direction = new Vector2(x, y);

        // Multiply the direction vector by the movement speed
        _batVelocity = direction * MOVEMENT_SPEED;
    }

    private void CheckKeyboardInput()
    {
        // If the space key is held down, the movement speed increases by 1.5
        float speed = MOVEMENT_SPEED;
        if (Input.Keyboard.IsKeyDown(Keys.Space))
        {
            speed *= 1.5f;
        }

        // If the W or Up keys are down, move the slime up on the screen.
        if (Input.Keyboard.IsKeyDown(Keys.W) || Input.Keyboard.IsKeyDown(Keys.Up))
        {
            _slimePosition.Y -= speed;
        }

        // if the S or Down keys are down, move the slime down on the screen.
        if (Input.Keyboard.IsKeyDown(Keys.S) || Input.Keyboard.IsKeyDown(Keys.Down))
        {
            _slimePosition.Y += speed;
        }

        // If the A or Left keys are down, move the slime left on the screen.
        if (Input.Keyboard.IsKeyDown(Keys.A) || Input.Keyboard.IsKeyDown(Keys.Left))
        {
            _slimePosition.X -= speed;
        }

        // If the D or Right keys are down, move the slime right on the screen.
        if (Input.Keyboard.IsKeyDown(Keys.D) || Input.Keyboard.IsKeyDown(Keys.Right))
        {
            _slimePosition.X += speed;
        }
    }

    private void CheckGamePadInput()
    {
        GamePadInfo gamePadOne = Input.GamePads[(int)PlayerIndex.One];

        // If the A button is held down, the movement speed increases by 1.5
        // and the gamepad vibrates as feedback to the player.
        float speed = MOVEMENT_SPEED;
        if (gamePadOne.IsButtonDown(Buttons.A))
        {
            speed *= 1.5f;
            GamePad.SetVibration(PlayerIndex.One, 1.0f, 1.0f);
        }
        else
        {
            GamePad.SetVibration(PlayerIndex.One, 0.0f, 0.0f);
        }

        // Check thumbstick first since it has priority over which gamepad input
        // is movement.  It has priority since the thumbstick values provide a
        // more granular analog value that can be used for movement.
        if (gamePadOne.LeftThumbStick != Vector2.Zero)
        {
            _slimePosition.X += gamePadOne.LeftThumbStick.X * speed;
            _slimePosition.Y -= gamePadOne.LeftThumbStick.Y * speed;
        }
        else
        {
            // If DPadUp is down, move the slime up on the screen.
            if (gamePadOne.IsButtonDown(Buttons.DPadUp))
            {
                _slimePosition.Y -= speed;
            }

            // If DPadDown is down, move the slime down on the screen.
            if (gamePadOne.IsButtonDown(Buttons.DPadDown))
            {
                _slimePosition.Y += speed;
            }

            // If DPapLeft is down, move the slime left on the screen.
            if (gamePadOne.IsButtonDown(Buttons.DPadLeft))
            {
                _slimePosition.X -= speed;
            }

            // If DPadRight is down, move the slime right on the screen.
            if (gamePadOne.IsButtonDown(Buttons.DPadRight))
            {
                _slimePosition.X += speed;
            }
        }
    }

    protected override void Draw(GameTime gameTime)
    {
        // Clear the back buffer.
        GraphicsDevice.Clear(Color.CornflowerBlue);

        // Begin the sprite batch to prepare for rendering.
        SpriteBatch.Begin(samplerState: SamplerState.PointClamp);

        // Draw the tilemap.
        _tilemap.Draw(SpriteBatch);

        // Draw the slime sprite.
        _slime.Draw(SpriteBatch, _slimePosition);

        // Draw the bat sprite.
        _bat.Draw(SpriteBatch, _batPosition);

        // Always end the sprite batch when finished.
        SpriteBatch.End();

        base.Draw(gameTime);
    }
}
The key changes to the Game1 class include:
- The
_tilemapfield was added to hold the loaded tilemap. - The
_roomboundsRectangle was added to define the playable area within the tilemap to keep the slime and bat inside the walls. - In Initialize:
- The
_roomBoundsis set based on the tilemap's tile size. - The starting position of the slime is now set to be in the center of the room.
- The
- In LoadContent, the tilemap is loaded from the XML configuration file.
- In Update, the
screenBoundsvariable was removed and the collision logic has been updated to instead use the_roomBoundsinstead. - In Draw the tilemap is drawn.
Running the game now with these changes, our game now visually transforms from a simple screen with sprites to a proper game environment with walls and floors. The slime and bat are now confined within the walls of the dungeon defined by our tilemap.
| Figure 13-5: Gameplay with the tilemap rendered and the bat and slime contained within the dungeon walls |
Additional Notes
While the method provided in this chapter offers a straightforward approach to loading tilemaps from external configuration files, several dedicated tools exist specifically for creating tilemaps for games. Popular options include Tiled, LDtk, and Ogmo. These specialized tools export map configurations in various formats such as XML (similar to what we implemented) or JSON, and often include additional features like multiple layers, object placement, and custom properties for tiles.
Although these tools are more robust than our implementation, the underlying concept remains the same: a tilemap is fundamentally a grid layout where each cell references a tile ID from a tileset. The principles you've learned in this chapter form the foundation for working with any tilemap system, regardless of which tool you might use.
Conclusion
Let's review what you accomplished in this chapter:
- Learned about tilemaps and how they're used in 2D game development.
- Created a
Tilesetclass to manage collections of tiles from a texture atlas. - Implemented a
Tilemapclass to render grid-based game environments. - Created an XML-based tilemap definition system for storing level layouts.
- Updated our game to use tilemaps for the game environment.
In the next chapter, we'll start exploring audio to add sound effects when a collision occurs and background music to our game.
Test Your Knowledge
What is the main advantage of using tilemaps for game environments rather than individual sprites?
Tilemaps offer several advantages: memory efficiency (reusing tiles instead of storing complete environments), performance optimization (batched rendering), and design flexibility (easier to create and modify levels). They allow creating large game worlds by reusing a small set of tiles in different arrangements.
What is the relationship between a tileset and a tilemap?
A tileset is a collection of individual tiles stored in a texture atlas, where each tile has a unique ID. A tilemap is a grid-based structure that references tiles from the tileset by their IDs to create a complete game environment. The tileset provides the visual elements, while the tilemap defines their arrangement.
Why might you use an XML definition for a tilemap instead of hardcoding the tile layout?
Using XML definitions for tilemaps separates level design from game code, offering several benefits: easier level editing (without changing code), support for multiple levels, ability to create external level editors, and better organization of game content. It also allows non-programmers like game designers to create and modify levels.
In our implementation, how does the Tilemap's Draw method work?
The Tilemap's Draw method iterates through each position in the grid. For each position, it:
- Retrieves the tile ID stored at that position.
- Gets the corresponding texture region from the tileset.
- Calculates the screen position based on the grid coordinates and tile size.
- Draws the texture region at that position using the sprite batch.